
Applying Coppercoat Antifouling
Click on an image to read the article.


Article Transcript
Applying Coppercoat antifouling
Coppercoat is a long established antifouling which was first launched back in 1991, and like many boat owners I have seen the product exhibited at boat shows and have read reports about it.
When discussing it with others I’ve received mixed responses, ranging from glowing testimonials about its performance to more disparaging remarks about its appearance on a hull, with comments such as ‘it looks like an old church roof.’ I’ve read the brochures, but I thought the best way to find out more about it was to try it out myself. However, I didn’t want to commit to the time, expense and extra labour involved in applying a new coating system altogether to my main boat where I use traditional antifouling. Also, if I did use it on the big boat I would prefer to apply it myself, and I was wary about using a new type of epoxy coating on a large scale. I have experienced how epoxy coatings can go wrong in the past for various reasons, and I didn’t want my whole hull affected if there was a problem. However, my tender which is afloat most of the year on the River Hamble does suffer from heavy fouling which I regularly have to scrub off when I beach her. I have not used traditional antifouling on it because of the staining you get from both hard and soft varieties on hands, cloths and straps when car-topping the boat etc. What I wanted was an antifouling coating which was clean, effective and I could put on and forget about, and Coppercoat seemed an interesting option. Here was the ideal smaller project on which to try it out.
On further research, it transpires it is regularly used on smaller craft. The manufacturers told me it can withstand regular haul-outs, and unlike conventional antifouling paints it does not oxidise and deteriorate when out of the water. Currently it is used by manufacturers of craft such as Cornish Crabbers, Honnor Marine, Swallow Boats, Ribeye, Ribcraft, Drascombe Luggers, Plymouth Pilots and the Hawk 20. Being a waterbased epoxy it contains no VOCs (volatile organic compounds) so it is both environmentally friendly and
doesn’t give off strong solvent vapours when you apply it. It is sold in 1lt units, and one pack would be sufficient to treat my 2.4m (8ft) tender. The
retail price for a 1lt unit is £70,
plus £8.50 for delivery, plus
VAT: a total of £94.20.
TOP TIP
When sanding down, cheap
abrasive paper is a false
economy and quickly
disintegrates. A decent brand
might be more expensive at
the start, but it lasts so much
longer that it works out more
cheaply in the long run.
Coppercoat is a water-based epoxy antifouling which can be used on all
sizes of craft. David Parker applies it to a tender and describes the process
Practical Boat Owner 585 April 2015 • www.pbo.co.uk 45
Applying Coppercoat antifouling
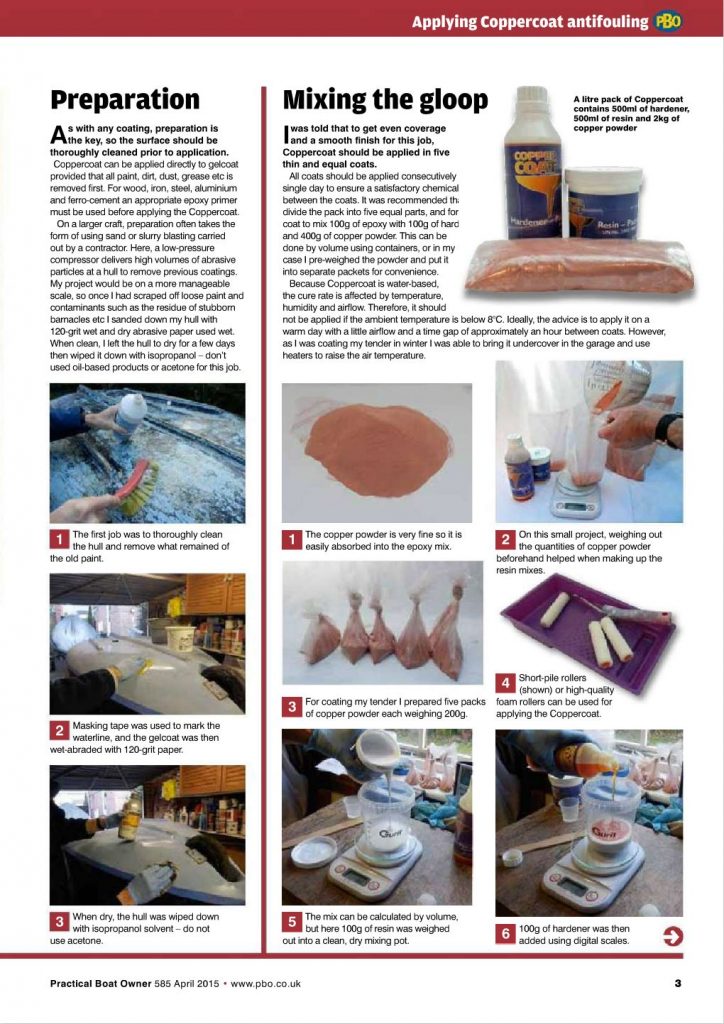
Preparation
1 The fi rst job was to thoroughly clean
the hull and remove what remained of
the old paint.
2 Masking tape was used to mark the
waterline, and the gelcoat was then
wet-abraded with 120-grit paper.
3 When dry, the hull was wiped down
with isopropanol solvent – do not
use acetone.
As with any coating, preparation is
the key, so the surface should be
thoroughly cleaned prior to application.
Coppercoat can be applied directly to gelcoat
provided that all paint, dirt, dust, grease etc is
removed fi rst. For wood, iron, steel, aluminium
and ferro-cement an appropriate epoxy primer
must be used before applying the Coppercoat.
On a larger craft, preparation often takes the
form of using sand or slurry blasting carried
out by a contractor. Here, a low-pressure
compressor delivers high volumes of abrasive
particles at a hull to remove previous coatings.
My project would be on a more manageable
scale, so once I had scraped off loose paint and
contaminants such as the residue of stubborn
barnacles etc I sanded down my hull with
120-grit wet and dry abrasive paper used wet.
When clean, I left the hull to dry for a few days
then wiped it down with isopropanol – don’t
used oil-based products or acetone for this job.
➜
I was told that to get even coverage
and a smooth fi nish for this job,
Coppercoat should be applied in fi ve
thin and equal coats.
All coats should be applied consecutively in a
single day to ensure a satisfactory chemical bond
between the coats. It was recommended that I
divide the pack into five equal parts, and for each
coat to mix 100g of epoxy with 100g of hardener
and 400g of copper powder. This can be
done by volume using containers, or in my
case I pre-weighed the powder and put it
into separate packets for convenience.
Because Coppercoat is water-based,
the cure rate is affected by temperature,
humidity and airflow. Therefore, it should
not be applied if the ambient temperature is below 8°C. Ideally, the advice is to apply it on a
warm day with a little airflow and a time gap of approximately an hour between coats. However,
as I was coating my tender in winter I was able to bring it undercover in the garage and use
heaters to raise the air temperature.
A litre pack of Coppercoat
contains 500ml of hardener,
500ml of resin and 2kg of
copper powder
1 The copper powder is very fi ne so it is
easily absorbed into the epoxy mix. 2 On this small project, weighing out
the quantities of copper powder
beforehand helped when making up the
resin mixes.
3 For coating my tender I prepared five packs
of copper powder each weighing 200g.
4 Short-pile rollers
(shown) or high-quality
foam rollers can be used for
applying the Coppercoat.
5 The mix can be calculated by volume,
but here 100g of resin was weighed
out into a clean, dry mixing pot. 6 100g of hardener was then
added using digital scales.
Mixing the gloop
46 Practical Boat Owner 585 April 2015 • www.pbo.co.uk
PRACTICAL
As soon as the two-pack epoxy is
mixed to the correct ratios with
the right amount of copper powder
added and well stirred in, the coating
should be applied.
Application should be by roller, not
brush. Using short-pile simulated mohair
or high-quality neoprene foam sleeves is
recommended: however, I found that the
short-pile rollers I used shed some small
fibres. Where they came off they could be
seen in the coating, which was frustrating. If
you try to remove them before the coats are
cured you can end up taking off all the epoxy
as well. I would recommend using decent
foam rollers to be on the safe side.
I found that as a water-based product, the
coating went on more smoothly and easily
than a traditional epoxy coating, but during
application it is important to keep mixing it to
prevent the heavier copper particles settling
out. This is especially the case when coating
a boat upside down as the particles might
sink away from the surface. I’m told this can
happen on bigger boats at the top of rudders,
for example: people sometimes find growth
where they have applied it more thickly and
more fluid has allowed more settlement.
As I started, the first coat seemed patchy:
but it is important not to put it on too thickly
because, like metallic paints, it can have a
tendency to run. It is better to build up the
antifouling layer in thinner coats, and with
further coats I found the thickness built up
nicely. I would wait until the coating felt
almost dry before applying the next one,
and as it turns out I didn’t get five coats out
of the pack but just over four-and-a-half.
When mixing the final coat, the ratios were
amended accordingly by weight.
Cleaning up
Before the epoxy has cured, equipment
can be cleaned in warm water. However,
don’t wash epoxy products into the water
course or down drains. When cured it is an
inert plastic, so trays and rollers can be
disposed of in the normal way.
Once the coats are all completed the
full cure takes place after five days, but
the coating should apparently be cured
sufficiently to launch after 72 hours at 20°C.
As I was doing mine in the winter with colder
temperatures I left it for seven days before
moving the hull. When it was fully cured
I then gave the hull surface a light burnish
with a superfine Scotch-Brite pad to expose
some copper.
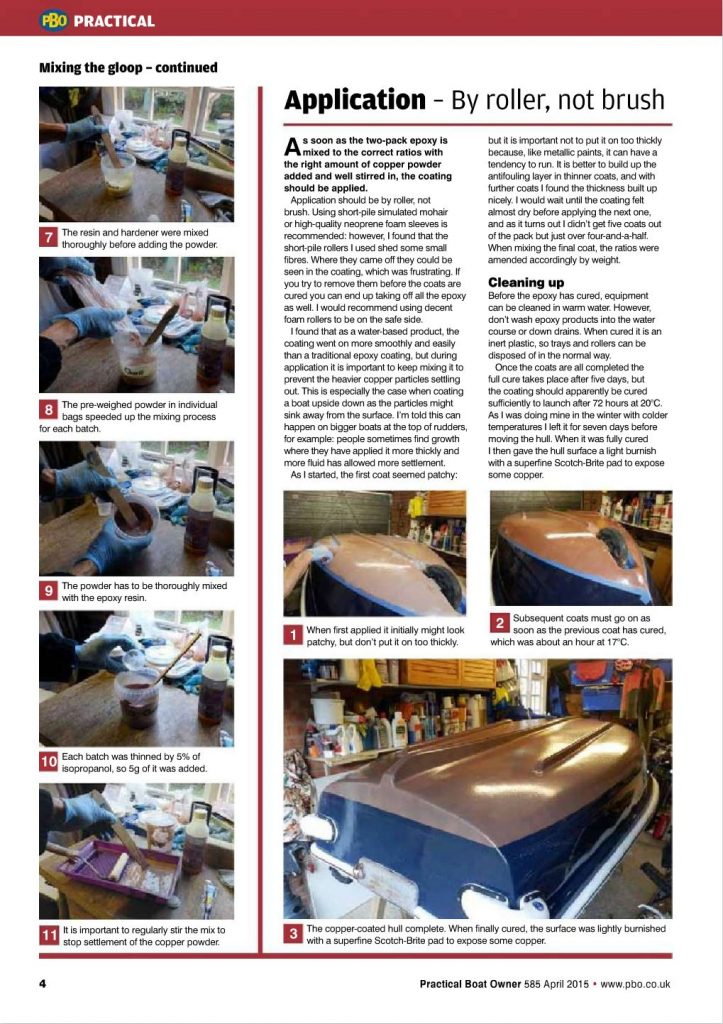
1 When first applied it initially might look
patchy, but don’t put it on too thickly.
2 Subsequent coats must go on as
soon as the previous coat has cured,
which was about an hour at 17°C.
3 The copper-coated hull complete. When finally cured, the surface was lightly burnished
with a superfine Scotch-Brite pad to expose some copper.
Application – By roller, not brush
7 The resin and hardener were mixed
thoroughly before adding the powder.
8 The pre-weighed powder in individual
bags speeded up the mixing process
for each batch.
9 The powder has to be thoroughly mixed
with the epoxy resin.
10 Each batch was thinned by 5% of
isopropanol, so 5g of it was added.
11 It is important to regularly stir the mix to
stop settlement of the copper powder.
Mixing the gloop – continued
Practical Boat Owner 585 April 2015 • www.pbo.co.uk 47
Applying Coppercoat antifouling
This is a picture of the boat after it had been in the water for six months and used
constantly – so throughout the season – and I’m very impressed. Previously, the hull
would have had very heavy fouling on it, but as you can see the only growth is on the
aluminium keel bands, which I wasn’t able to prepare in the same way as the rest of
the hull. As I pointed out previously, the prep work is the key factor with epoxy.
I found coating a small craft like this
was a valuable way of learning about
the product should you plan to tackle a
bigger project with Coppercoat. Even
with a small boat I found the antifouling
to be effective over a six-month span
and, having done it once, I would now
feel more confident about taking on a
larger boat. Meanwhile, I shall monitor
its performance over a longer period.
■ Full application details come with the
products, and more information is
available from www.coppercoat.com.